

Makeup tips for beginners at home start with the five-product starter kit Bobbi Brown’s editors and Sephora’s tutorials keep recommending, tinted moisturizer, concealer, cream blush, brown mascara, and tinted lip balm. The no-makeup makeup look takes five to fifteen minutes once you have practiced.
Quick answer: Makeup tips for beginners at home start with a five-product kit, tinted moisturizer, concealer, cream blush, brown mascara and tinted lip balm, applied with your fingers in a ten-minute no-makeup makeup look after a minute of skin prep.
Most makeup tutorials are quietly built for people who have already been wearing makeup for ten years, which is why the genuinely-beginner videos on YouTube tend to either go too fast or assume you already own contour palettes and brush rolls that nobody starting out actually needs. The five-product starter the editors at Bobbi Brown and the tutorials at Sephora keep coming back to is gentler, cheaper, and more flattering than most of what the algorithm serves up. Tinted moisturiser, concealer, cream blush, brown mascara, tinted lip balm.
This post is that five-product kit in detail, plus the ten-minute no-makeup makeup look that is the foundation for almost everything else you will eventually want to do. We cover the skincare prep that stops makeup from pilling, the finger-blending technique that beats most brushes for beginners, the under-eye triangle method that actually brightens your face, and the five reliable mistakes that make beginner makeup feel harder than it needs to.
By the end you will have a routine you can do in ten minutes, a kit you can build for under fifty dollars at the drugstore, and the look the editors call effortless, which is just makeup that respects your face and makes you look like yourself on a good day.
The Five-Product Beginner Starter Kit
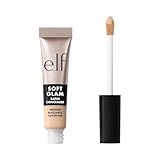
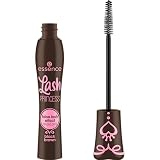
The five things to buy first, in priority order. Each one is forgiving, multi-use, and works for almost every skin tone with a small adjustment for shade. The whole kit can come in under fifty dollars from drugstore brands.




Recommended blogs to read:
- Glow Up Basics for Actually Looking and Feeling Like Yourself Again
- Skincare Routine Order for Beginners Made Simple
- Glow Up Tips for Teenage Girls That Create a Real Difference
- A Minimalist Beauty Routine for Calm Effortless Mornings
- A Clean Beauty Routine for Simple Non Toxic Self Care
Why Skincare Comes First (the Step Everyone Skips)
Sephora’s beginner makeup tutorials and Bobbi Brown’s editors say the same thing in slightly different words, every makeup look starts with skincare. The reason is technical, makeup sits on top of moisturized skin in a fundamentally different way than it sits on top of dry or barrier-compromised skin.
The same foundation looks dewy and natural on one and patchy and tight on the other.
The minimum skincare prep is moisturizer, applied five minutes before makeup. Vitamin C serum underneath is a nice add. Heavy primers are usually overkill for beginners and tend to cause the pilling that frustrates everyone in their first month.
If your skin still looks tired after makeup, the problem is almost always upstream of the makeup. More moisturizer, more water, more sleep, less foundation. The order of operations matters more than the product brand.
The Ten-Minute No-Makeup Makeup Look
The look the no-makeup makeup tutorials are all teaching, written out as a sequence you can actually follow. Ten minutes once you are practiced. Closer to fifteen the first few weeks. Five if you have the routine down and are running late.
Step 1, prep (1 minute)
Moisturizer, then sunscreen. Wait two minutes if you have the time. The waiting is what stops the pilling.
Step 2, tinted moisturizer (2 minutes)
A pea-sized amount, dotted across the forehead, nose, chin, and cheeks. Blend with clean fingers in small circles, working outward from the center. Skip the foundation brush for the first six months. Fingers are warmer and gentler and produce a better blend than every YouTube tutorial admits.
Step 3, concealer (2 minutes)
Dot under the eyes in a triangle (the wide end at the lash line, the point toward the cheek), and on any blemishes or spots that are still showing through the tinted moisturizer. Tap in with your ring finger. The ring finger has the gentlest pressure of any digit, which is exactly what under-eye skin needs.
Step 4, cream blush (1 minute)
Dot on the apples of the cheeks (the part that lifts when you smile) and blend back toward the temples. A second dot on the tip of the nose if you want that running-around look. Cream blush gives the most flattering finish for almost every skin type, and it doubles as lip color when you run out of lip balm.
Step 5, mascara and lip balm (3 minutes)
Brown mascara, one coat, wiggling the wand at the base of the lashes and sweeping up. Brown is the beginner choice because it is forgiving, black is for night two of the practice. Tinted lip balm, applied straight from the tube. The whole face takes ten minutes and the look is the one editors call effortless.
The Mistakes That Make Beginner Makeup Feel Hard
Five reliable ways to make this harder than it needs to be. If you have tried makeup before and given up, one of these is almost always why.
- Buying full-coverage foundation as your first base. Full coverage is harder to blend, looks heavier, and shows mistakes more obviously. Tinted moisturizer is the right first base.
- Starting with winged eyeliner, dark eyeshadow, or contour. These are year-two techniques. They look easy in tutorials because the person doing them has been practicing for ten years.
- Buying makeup brushes before you can use them. Fingers blend cream products better than any brush for the first six months. Add brushes when you start using powder products.
- Skipping the moisturizer because you have oily skin or you are in a rush. The moisturizer is what makes the makeup blend.
- Doing your full face under bad lighting. Daylight, or a ring-light alternative, makes the application twenty times easier and saves you from the bathroom-mirror foundation line.
When Makeup Tips for Beginners Are Not Enough
The five-product starter kit is for everyday no-makeup makeup. Special occasion looks (weddings, photos, evening events) benefit from a paid lesson with a makeup artist who can teach you techniques for your specific face shape in two hours. Many Sephora stores offer free thirty-minute consultations, and Ulta’s beauty advisors do similar.
If you have a skin condition that makeup is meant to cover (active acne, rosacea, melasma, scarring), a dermatologist visit is the more durable next step. Makeup is a layer on top of skin, and a skin condition that improves makes the makeup easier and less necessary.
The beginner starter kit is meant to give you your face on a good day, not paper over a worse one.
Beginner Makeup Questions, Answered
What makeup products do beginners need?
Five products to start, tinted moisturizer, concealer, cream blush, brown mascara, and tinted lip balm. Each is forgiving and multi-use. The whole kit can come in under fifty dollars from drugstore brands.
How do I do natural makeup at home as a beginner?
Moisturize first, then sunscreen. Tinted moisturizer blended with fingers, concealer in an under-eye triangle, cream blush on the apples of the cheeks, one coat of brown mascara, tinted lip balm. Total time, ten to fifteen minutes for beginners.
What is the difference between tinted moisturizer and foundation?
Tinted moisturizer is lightweight, hydrating, and provides sheer coverage that lets your skin show through. Foundation is thicker, has more pigment, and covers more, which also means it looks heavier. Beginners should start with tinted moisturizer.
Should I use fingers or brushes for beginner makeup?
Fingers for cream products (tinted moisturizer, concealer, cream blush). The warmth helps blending and the pressure is gentler. Add brushes only once you start using powder products, usually around month four or five of practice.
How long does no-makeup makeup take?
Five to fifteen minutes depending on practice. The first few weeks take closer to fifteen. By month two, the look takes ten. By month four, it can be done in five if you are running late.
Why does my makeup pill or look patchy?
Almost always upstream of the makeup. The moisturizer was not absorbed before the makeup went on, the skin was not exfoliated in a few weeks, or you used too much product. Wait two minutes between skincare and makeup. Use less product. The pilling stops.
Key Takeaways
- Makeup tips for beginners at home start with the five-product starter, tinted moisturizer, concealer, cream blush, brown mascara, and tinted lip balm.
- Skincare comes first, always. Moisturizer five minutes before makeup is what stops the pilling and gives the makeup a base to blend into.
- Fingers blend cream products better than brushes for the first six months. Add brushes when you start using powder.
- The ten-minute no-makeup makeup look is, in order, prep, tinted moisturizer, concealer in an under-eye triangle, cream blush, brown mascara, tinted lip balm.
- Skip the winged liner, the contour, and the dark eyeshadow for year one. They look easy in tutorials because the person doing them has been practicing for ten years.
What Makeup Tips for Beginners at Home Should You Try First?
Makeup tips for beginners at home done well are five products, blended with fingers, applied in ten minutes, after the moisturizer has had two minutes to settle. The look is the one editors call effortless, the one that makes you look like yourself on a good day. The winged liner can wait. Year one is about practice, not technique.
Since skin prep does so much of the work, these at home skincare devices are worth reading before you buy more makeup, and my list of luxury at home treatments turns that prep minute into a proper ritual.
Last update on 2026-10-09 / Affiliate links / Images from Amazon Product Advertising API